You want to learn the secret for creating irresistible food images! I HEAR YOU!
When I popped the question ‘what do you find the most challenging in food photography?’ on instagram – most of you wrote that food styling is causing you all the trouble!
So, today, I want to take you behind the scenes with a little styling video that I recorded together with lovely Kat from Kat’s Films.
BECAUSE WHO DOESN’T LIKE A SNEAK PEAK INTO WHAT HAPPENS ON THE OTHER SIDE OF THE CAMERA?
And there is a lot happening!
Hope you’ll find it inspiring and I’ll see you on the other side with some of my favourite food styling tips 🙂
WAKE UP ALL THE SENSES
When is comes to creating jaw-droppingly gorgeous images , FOOD STYLING is CRUCIAL MY FRIENDS!!!!
It’s an art of making food look attractive in front of the camera! It’s what makes people drool when they look at your food image.
But it’s not only making food look pretty. It’s all about visualizing the taste, waking up all the senses, taste buds including! Your task is to ignite your viewers imagination!
When you walk into the bakery, all of your senses are bombarded at once, am I right? Your eyes can see all the colours, textures and shapes of baked goods, you can smell freshly baked bread, hear the crust crunch and feel the texture of it while you hold a sandwich in your hand. Not too mention you can actually taste it!
FOOD PHOTOGRAPHY should create the same experience – the hard part is, you have to do it all through your viewer’s eyes.
So,let’s talk about the food styling details that create the sense of vitality, energy and visual excitement, shall we?
01. THE SECRET TO EFFORTLESS LOOKING FOOD – IS ALWAYS MAKING AN EFFORT 🙂
We often look at these ‘damn’ delicious photographs, and imagine that the person who created them has some magic dust on her/his fingers 🙂
The truth is, food styling takes a lot of thought, time and EFFORT! When I say effort I mean – taking the time to plan how you are going to approach the dish preparation and putting it all together. It also means, going extra mile to source the best ‘photo-worthy’ ingredients. And taking time to prepare the dish. I promise it’s all worth it though and as a result you’ll have an image you are super proud of!
When I’ve recently shot a cover for Clean Eating Magazine (you’ll be able to see it very soon), it took me over an hour to source all the ingredients (it can take much more time that this too!), 30 minutes planning how I want the dish to look while making sure it follows my client’s brief, over an hour preparation and styling (!!!) – it was a simple dish and no cooking involved – still this is how much time it took, 15 minutes setting up my set and 5 minutes shooting 🙂
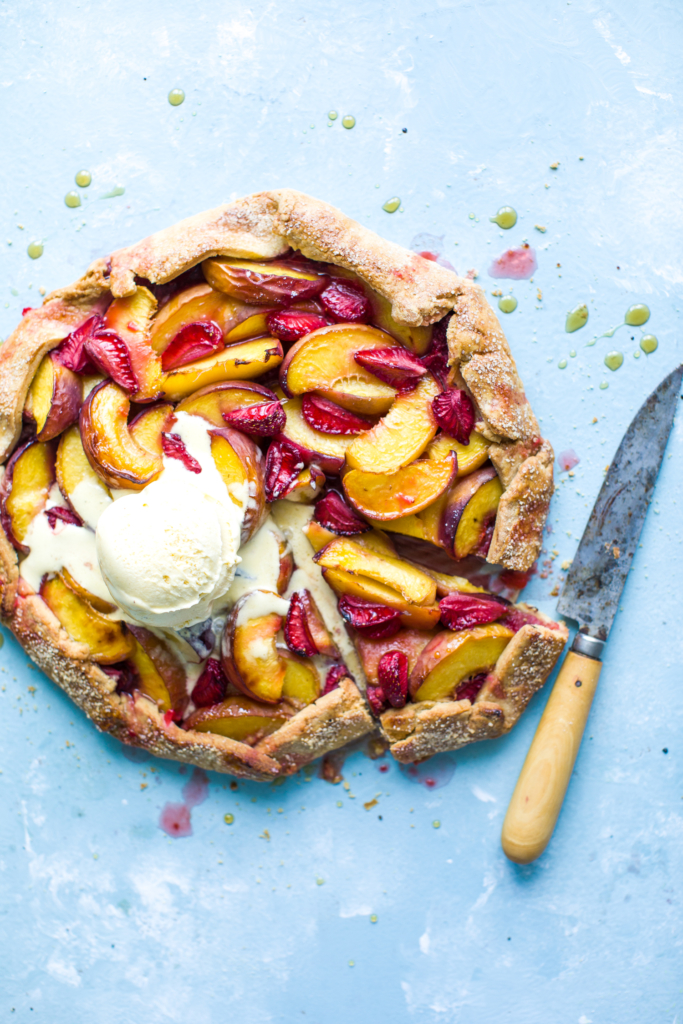
You can also see how much work went into this galette from the video, every element of the process was carefully thought of, while having a final dish in mind. From getting the juiciest fruit available, to slicing it carefully so that the fruit looks proportional when put together, and ensuring that the pastry has a beautiful round shape. It took a long lime before it was ready to photograph.
02. FRESH!
Getting the freshest ingredients possible is of course nonnegotiable – but I am sure you already know that. It happened on several occasions that together with a client we swapped the ingredients in the dish for something else (also delicious!) rather than use not such a good-looking produce that was available! We just knew it wouldn’t look attractive in the image and it that case the photograph wouldn’t encourage anyone to cook the dish.
When I say fresh I also mean, your job is to keep food ‘alive’ when photographing it. There is always a lot happening on set, so make sure that you always look back at the food to check if it still looks tiptoe, before capturing your final shot.
- Ensure that nothing looks dry and unappetizing – brushing water or oil on your ingredients can really work magic here!
- Spray some lemon juice on apples, bananas or avocados -this will prevent them from browning and give you extra time when photographing.
- Compose the photograph with empty plates and dishes or ‘dummies’ when photographing food that won’t last long on set,so that when it arrives you can capture it while it’s still fresh!
- Garnish just before capturing the final shot. If you decorate your dish (with herbs for example) too early, they might look flat before you take that last shot. Keep checking on your garnish, and replace it the fresh one if needed.
Looking at our galette here as an example I composed the photograph exactly how I wanted it to look before adding an ice cream. If I didn’t do that I was risking the ice cream melting completely, before I composed the shot I was proud off.
Ps. Ok, let’s be honest here :), in the final photograph I took, it melted much more than I would like it too – but we wanted to make sure we have the material for the video recorded before I took the shot 🙂
03. THE BIGGEST STRENGTH OF THE DISH?
What is that one thing that make your dish so extraordinary? Is it the colour, the shape, or maybe the layers? Focus your styling on that special something.
When I was photographing this galette, I though it’s biggest strength was the juicy fruit filling. It’s such a summery dish and I wanted to make sure it bursts with freshness and flavour. I could predict however that the fruit will start to dry in the oven and also when cooling down, so I reserved some fresh fruit juice that was leftover after coating the fruit with sugar and I poured it over the top just before taking the final shots 🙂 This little trick brought my dish back to life.
04. COLOUR
The best food developers and food stylists know how to pair different colours of food while making sure the flavours work together to make your taste buds satisfied.
Your job is not only make the food taste delicious but also ensuring it looks INCREDIBLE at the same time. Does your dish need a little helping hand with some extra colour or is it vibrant enough already?Remember we eat with our eyes first!
Get friendly with colour wheel to learn how to pair colours effectively for eye-pleasing images.
If we look closer at the galette from our video, you can see that the galette itself follows analogous colours: yellow flesh of the peach, orange looking pastry, and red strawberries. Additionally it was paired with a complimentary colour background – blue – to really make it pop!
05. STYLE IT FOR THE ANGLE!
Always style it for the angle you are shooting to show off different components! Some dishes might work great from several angles but you need to trust your visual instincts here! Some dishes, sadly, won’t.When I was styling the dish for the cover I was telling you about – the magazine asked me to do two different angles of the same dish so I had to style the dish twice – one for overhead and a different one for 3/4 angle.
06. LAYER!LAYER!LAYER!
This galette, although super simple, it has a lot of depth! All thanks to layering different elements on the top of one another in our final dish! If you don’t want your dish to look flat, think about how you can incorporate different layers for that 3D effect.
Let’s have a closer look – we have a layer of pastry, a layer of coarse sugar on the top of the pastry can be counted as an additional layer too, then there are few layers of sliced peaches , a layer of strawberries and a melting ice cream scoop.
The secret is to make sure the layers are very subtle and cohesive. They should blend in and be so natural for the eye that your viewer won’t even think of them as layers. They should feel like they belong.This makes the image feel easy on the eye, not staged or forced. Always try to mix different shapes and textures for extra interest!
07. DRESS IT UP
Always think: ‘How can I make the dish look better?’ Everything can be done better! Is it a layer of icing sugar your cake is missing? Maybe a scoop of ice cream will add something more interesting? Or sprinkling coarse sugar on the pastry for extra texture?
Sometime, adding maple syrup can bring your dish to life! And when it comes to savoury, something as simple as freshly ground salt and pepper can make the dish complete.
08. ADD MOVEMENT FOR EXTRA TEMPTATION
My favourite way to evoke emotions is adding an illusion of movement to a still life image. It shows your viewer that the scene is happening right now, it creates an image that is much more inviting and makes your viewer feel a part of the it. It’s all about the small details that keep everything real.
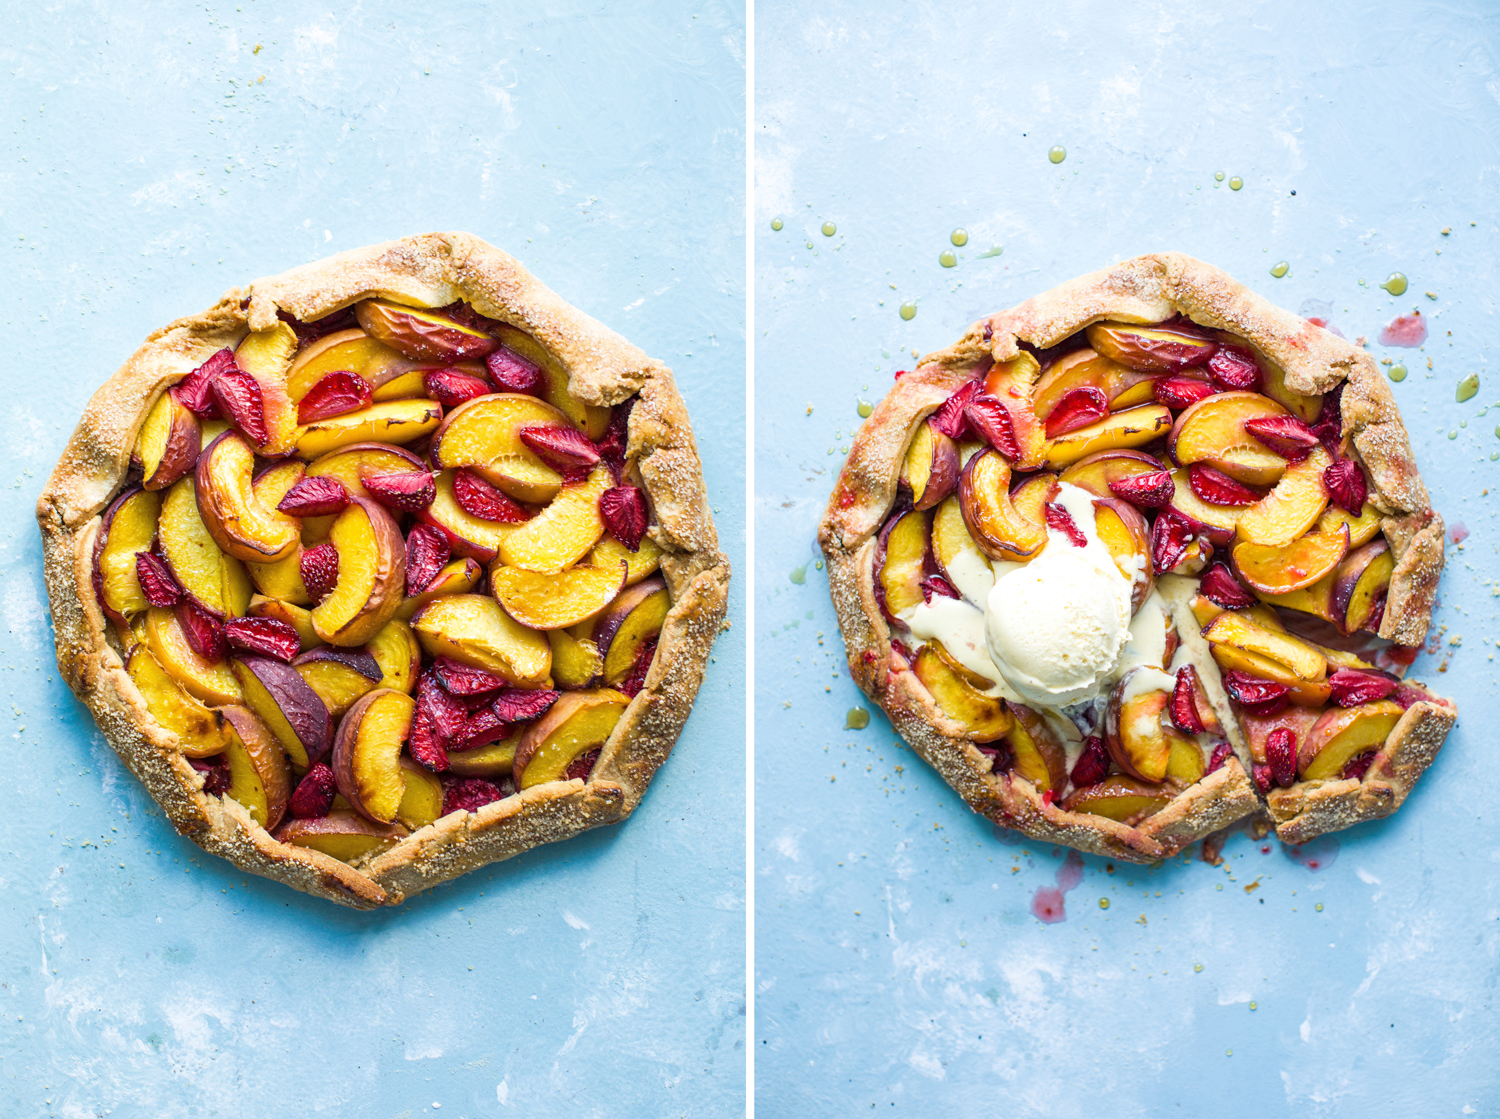
On the left you can see what the galette looked like when it came out the oven. Trust me here, it looked IRRESISTIBLE when I placed it on a kitchen counter!!! Camera however sees things differently than our eyes. Here is a proof – the photograph looks boring, there is no life in it, it gives you a feeling that there is something missing.
On the right, you can see the same galette but there is so much movement happening, thanks to the styling! The slice has been cut out, there are juices spilled around, along with some crumbs. And the melting ice cream makes the styling look complete.
Don’t be afraid to cut out a slice out of the cake, or maybe even two. Dig in fork into a piece of the cake. Spill juices. Scatter crumbs – this always wakes up imagination!
09. THINK OUTSIDE THE BOX
Food photography is all about TAKING CONTROL. In this galette image, I really wanted to make sure the ice-cream is melted in a beautiful way, creating a lot of movement, but not overpowering the dish. What I did then, I melted couple of tablespoons of ice cream in a pot over a very low heat, I then placed an ice scoop on the galette and poured melted ice cream with a spoon exactly how I wanted the melt to look – I took control.
I’ll give you another great example! When I shot an image for crumble packaging sometime ago, my client really wanted the image to show a thick layer of fruit (of course they could not be overcooked). When we tried to do the crumble the traditional way, the fruit lost its shape, if we took it out of the oven earlier to make sure the fruit keeps it shape – the crumble was too pale. In the end, I cooked it all separately – fruit in the pot on the cooker, so that it looked cooked but it held the shape, and crumble in the oven until it was crispy and golden. Then I put it all together for a perfect picture. Like I said it’s all about taking control 🙂 And sometimes this will mean thinking outside the box.
10. DON’T OVERWORK IT
And just last little thought friends! Try to keep styling as natural as possible otherwise your dish will look forced. Imperfections are perfect. Embrace them!
Is there any dish you find challenging to style? Let me know in the comments below!!!
SAVEUR AWARDS
My blog, Bea’s cookbook, is a finalist in Saveur Blog Award in BEST PHOTOGRAPHY CATEGORY (I am mind blowned!).
IT WOULD MEAN THE WORLD IF YOU COULD SEND YOUR VOTE MY WAY. VOTING takes second – all you have to do is follow this LINK, scroll down to find my blog in best photography category and leave your vote.
THANK YOU FROM THE BOTTOM OF MY HEART!!!